
Our free online inventory system has a little something for everyone. Stockpile let's you track your inventory in a number of ways. Some of these include SKU number, manufacturer, location and area. Today we'll look at how to manage your areas with Stockpile. You can use areas to organize your items however best meets your needs. They can be physical or logical as we touched on when learning about adding items. For example, a traditional store might want to track items by shelf and/or aisle. A traveling or mail order business might want to group items by category. Whichever way you chose, Stockpile give you control. You can setup your areas in 3 ways:
1. From the setup screen, after you first register
2. From the Add Item screen, for adding on-the-fly
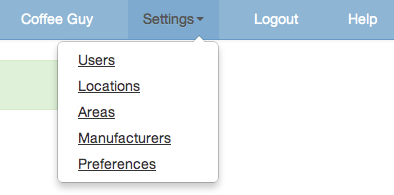
3. From the Settings menu
Today we'll work with the Settings menu. It will provide you with the most options:
Clicking on Areas brings you to the Manage Areas screen. Our fictional coffee supply business has chosen to group their items in logical categories rather than by physical location. Also, they have 1 inactive area:

From here, you can easily add, deactivate and re-activate your areas. Areas just take one field - their name. Active areas are available for adding new items to track. All areas are available when searching and filtering. Inactive areas are hidden by default but can be revealed with a click.

Apparently, the Novelty items just weren't working out. This coffee company must attract some serious coffe drinkers!
You can see in the menu shot above, that locations and manufacturers can be managed in the same way. So if you haven't already, sign up and let Stockpile help you get organized!